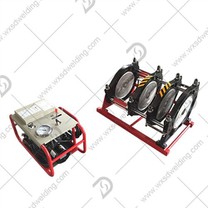
Step 1: Determine the Overall Fault Direction
After powering on, observe the overall status. This step will narrow down the possible causes:
1. No response after powering on, no component works: The fault lies in the power supply/electrical control system (main power supply, leakage circuit breaker, main fuse, main power line).
2. Display is lit and buttons respond after powering on, but a specific component does not work: The fault lies in the corresponding non-working component system (e.g., heating plate not heating → temperature control heating system; oil cylinder not moving → hydraulic power system).
Step 2: Step-by-Step Location of Specific Components
Based on the general direction determined in Step 1, pinpoint the fault using the following logic:
1. Power Supply/Main Control System Fault Location
If the machine is unresponsive: First check if the external input voltage matches, then check if the leakage circuit breaker is closed, and finally check if the main fuse is blown. After ruling out external problems, check if the internal main wiring terminals are loose.
Frequent tripping: This is most likely due to a short circuit in the power cord of the heating plate/oil pump/milling cutter. Disconnect the power to each component one by one and test the machine. If disconnecting a component stops the tripping, the corresponding faulty part can be identified.
2. Heating/Temperature Control System Fault Location
Heating plate not heating at all: First, check if the heating plate's aviation connector is securely plugged in. Then, use a multimeter to measure the heating plate's resistance. Infinite resistance indicates a broken heating wire (a fault in the heating plate itself). Normal resistance indicates a fault in the temperature controller or a loose wiring connection.
Abnormal temperature display: A display of 1 indicates a short circuit in the temperature sensor; HH indicates a broken sensor wire; unstable temperature fluctuations are mostly due to poor contact of the temperature control dial or a loose sensor.
Slow but still heating: This is generally due to insufficient power supply voltage, a broken heating wire in some parts, or insufficient heating plate power.
3. Hydraulic/Power System Fault Location (Semi-automatic/Fully Automatic Models)
Oil Pump Motor Not Working: First check the microswitch and power plug. If pressing it produces a humming sound but the motor doesn't rotate, the capacitor is damaged or lacking oil, causing a blockage. No sound at all indicates a power supply problem.
Oil Pump Working but Cylinder Not Moving: First check if the hydraulic oil level is sufficient. Then check if the pressure relief valve is closed and if the pressure regulating valve is too loose. After ruling out these issues, the problem might be a clogged oil filter or a blocked quick-connect fitting.
Unstable Pressure and Frequent Pressure Drops: This is most likely due to debris stuck in the relief valve or aging and leaking seals.
4. Cutting/Butt Joint System Fault Location:
Milling Cutter Motor Not Turning: First check if the power plug is loose and if the brushes are worn out. Then check if the cutting oil pressure is too high, causing the motor to stop.
Uneven Milled End Face/No Material Output: First check if the cutting tool is dull. Then adjust the cutting tool height (normally 0.05-0.5mm above the surface). If the height is correct and the surface is still uneven, the milling cutter head is deformed. Excessive misalignment: First, rotate the pipe to adjust alignment. If the misalignment still exceeds 1mm after adjustment, it indicates clamp wear or frame deformation.
Step 3: Fault Reproduction Verification After locating the fault, power off and restart the machine. Reproduce the fault scenario to confirm that the fault location matches the troubleshooting results and avoid misdiagnosis.